Table of Contents
1.Overview of bleeding
Bleed and trim are two essential elements that must be included in printing. Adding bleed and trim marks to the print draft is the most basic operation for designers. Bleed is not about your wallet bleeding money, but about leaving a 3mm margin of error on the print. If you don't include bleed, your wallet might actually bleed! As mentioned earlier, bleed is necessary to account for errors due to factors like paper shrinkage, cutting offset, die-cutting shifts, etc. Without bleed, the edges of your print may have unprinted areas, which could lead to deductions or returns from clients, causing a significant financial loss.

2.When can blood be spared?
However, in some special cases, it is not necessary to bleed.
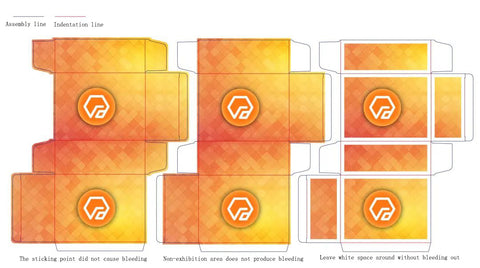
Case one: There is no printed content at the edges. When there is no printed content at the edges, bleeding is not necessary, as there will be no issues whether there is an error or not.

Illustrates two ways that do not need to be blood drawn.
Case tow: The bleed can be omitted for kiss-cut. Combining with the first scenario, when there is no content at the edge of the packaging, the bleed can also be omitted.

However! Not recommended this type of design, even though the print in the cut (die-cut) enough, will not lose the content, but the overall design will have a little change, for the compulsive designers, it is unbearable~

3.Diagonal Review
The diagonal line, also known as the trim line, is used in printing to indicate to printers and post-press workers where the finished product is located. It serves as an important reference for printers to ensure color alignment during printing. There are two types of diagonal lines, Western and Japanese styles.

The difference lies in the fact that Japanese style has more bleed lines than Western style, which serves the same purpose for the printing house.
4.How to create bloodlines and angles in Ai software?
The production of bleeding and bevels is very convenient in AI, and you don't even need to do it yourself. In a new document ↓

Set the bleed in the early stage of creating a new file by AI. If you have already established the file, you can reset it in File -> Document Setup (Alt+Ctrl+P).

This way, you will find a red border outside the canvas, which is the bleed.

Fill blocks and backgrounds require greater than the red outline below.

Once your design is complete, you can save it as a PDF format↓

At the marked position with bleed, check both the "Print Marks" and "Use document bleed settings" options, and choose either Japanese or Western for the print mark type. This way, you will get a standard print file.

However, it is important to note that if the document contains special colors, they will not be displayed in this way.